
Our Guide to Drive-Away Awnings
Camping in a campervan gives you a unique blend of flexibility and comfort. With recent tourism data showing a 28.5% jump in outdoor accommodation nights and August alone accounting for 118 million nights spent outdoors, getting the most out of your setup is a worthwhile investment.
As campsites become more crowded and the shift toward “wheels over walls” increases, making the most of your vehicle’s footprint is essential.
Jump to:
What are drive-away awnings?
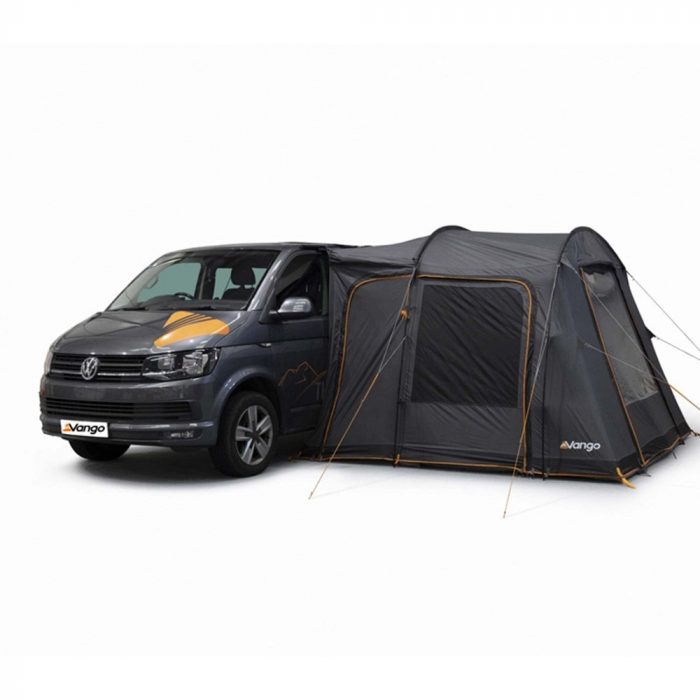
A drive-away awning is a freestanding tent that attaches to your vehicle, allowing you to detach it and drive-away during the day, then reattach it at night.
Drive-away vs Fixed Awnings
Drive-aways let you easily detach and explore, whereas fixed canopies rely on your van for support and must be fully packed away to move.
Are drive-away awnings worth it?
Drive-away awnings provide a vital, fully functional living extension for sleeping, storing bulky gear, or acting as a wet room.
What size awning do I need?
You must match the awning to your vehicle’s connection height and the specific diameter of your awning rail.
Air vs Pole Awnings: Pros and cons
Air beams offer rapid, one-person pitching and bend in high winds, while traditional poles are lighter, cheaper, and pack down smaller.
How do you secure a drive-away awning?
You will use a Kador strip kit for pre-attached rails, a pole-and-clamp kit for rain gutters, magnetic strips for flat steel roofs, or webbing straps.
How to pitch and secure your awning
Connect the tunnel to your van, tension and peg the groundsheet corners, erect the poles or air beams, and secure all guy lines.
How to maintain and clean a drive-away awning
Wash gently with lukewarm water, reproof the fabric periodically, and always ensure it is 100% dry before packing to prevent mould.
Checklist: What you will need
A complete setup requires your sized awning, the correct fixing kit, heavy-duty pegs, a pump (if inflatable), a groundsheet, and a mallet.
What are drive-away awnings?
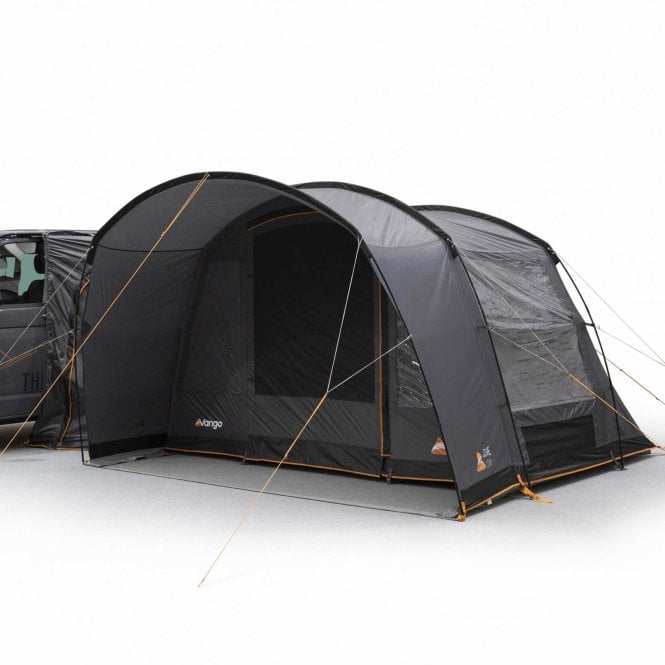
A drive-away awning is a freestanding tent that attaches to your van or motorhome. It uses a connecting tunnel that connects to the side or rear of your vehicle, allowing you to move easily between the two spaces.
These awnings stand on their own, so you can disconnect the tunnel, move your van, and reconnect when you return. Most are made from tough, weatherproof materials to keep you and your gear dry.

Drive-away vs Fixed Awnings
If you are debating between a detachable awning and a permanent canopy, it comes down to how you prefer to travel. If you are still weighing up the differences between drive-away tents, tailgate versions, or traditional permanent canopies, read our full guide on Choosing a Motorhome or Caravan Awning.
| Feature | Drive-away Awning | Fixed Awning |
|---|---|---|
| Mobility | Disconnects easily; leaves your pitch saved while you explore. | Permanently attached; you must pack everything away to move the van. |
| Structure | Freestanding with its own poles or air beams. | Relies entirely on the vehicle for support. |
| Space | Offers a fully enclosed, large living extension. | Primarily offers roof shelter (unless additional side panels are purchased). |
| Setup Time | Takes 10–20 minutes to pitch completely. | Can be attached in minutes. |
Are drive-away awnings worth it?
Drive-away awnings are a practical upgrade for campervan owners. They give you extra living space and make your campsite setup more flexible.
With more people camping in the UK, campsites are often crowded. An awning gives you a private, enclosed space you can use for several purposes:
- Accommodate extra guests: Add an inner bedroom tent for children or friends.
- Create a wet room: Act as an ‘airlock’ to strip off muddy boots and dry wet coats before entering the clean van.
- Store bulky gear: Safely keep bicycles, paddleboards, or a barbecue.
- Dine comfortably: Set up a table and chairs without blocking the walkway inside your van.
What Size Awning Do I Need?
You must ensure compatibility with your van’s height and rail size. Awnings are categorised by their attachment height (the distance from the ground to your van’s roof or awning rail).
- Low Awnings (170cm – 240cm): Designed for classic campervans like the VW Transporter or Ford Transit Custom.
- Tall/High Awnings (240cm – 290cm): Built for larger, coach-built motorhomes like the Fiat Ducato or Mercedes Sprinter.
Always measure your vehicle before purchasing. Furthermore, check the diameter of your awning rail. The vast majority of UK campervans use a 6mm or 4mm rail channel. You must match your connection kit to this specific diameter.
Learn more in our Awning Size Guide for Caravans and Motorhomes.
Air vs Pole Awnings: Pros and Cons
When selecting your awning, you will need to choose between traditional steel/fibreglass poles and modern inflatable air beams (such as Vango’s renowned AirBeam technology).
Inflatable (Air) Awnings:
- Pros: Exceptionally fast to pitch by one person. Highly resilient in high winds, as the tubes bend and pop back into shape rather than snapping.
- Cons: Heavier in the bag, bulkier to store, and requires a pump. They are generally more expensive.
Poled Awnings:
- Pros: Usually lighter and pack down smaller. Easier to split into separate bags for carrying. More affordable.
- Cons: Takes longer to assemble and usually requires two people. Rigid poles can bend or snap in severe storms.
How do you secure a drive-away awning?
Securing your awning correctly depends on the hardware fitted to your vehicle. The connection area can be a major source of confusion, so let’s break down the exact hardware you will encounter.
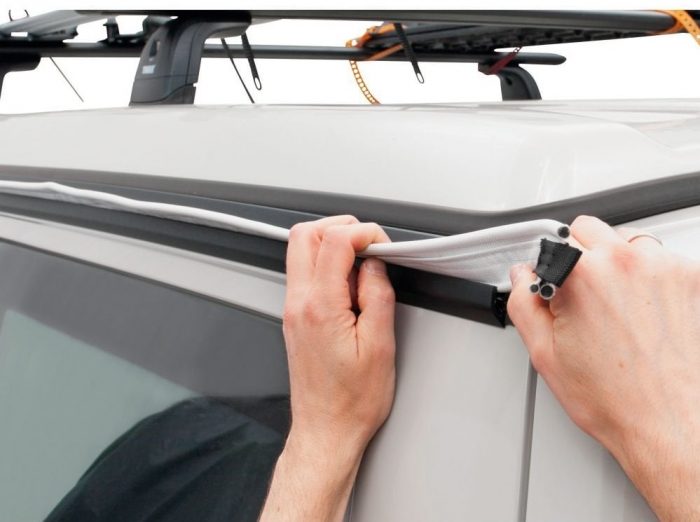
1. Pre-Attached Awning Rail (The Best Method)
If your van has a ‘C’ shaped metal channel on the roof or side, you will use a Fixing Kit. This kit consists of two parts:
- Kador Strip: A thick, connecting plastic cord with a bead on both edges.
- Figure-of-8 Strips: Rigid plastic channels shaped like an ‘8’.
One side of the Kador strip slides into your van’s rail. The Figure-of-8 strips slide onto the other side of the Kador strip, which then grips the awning beading on the tent. To drive away, you simply slide the Figure-of-8 strips off.
2. Pole and Clamp Kit
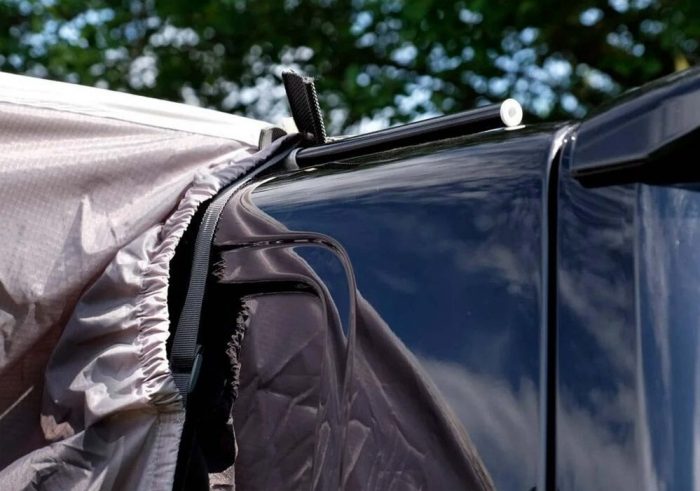
Ideal for older, classic vans with prominent rain gutters. A rigid pole is threaded through a fabric sleeve on the awning. You then place this pole into the van’s roof gutter and secure it with metal clamps.
3. Magnetic Strips
If your van has a flat, steel roof without rails, you can purchase a magnetic attachment band. Strong magnets secure the strip to the roof, providing a temporary rail for your awning to attach to.
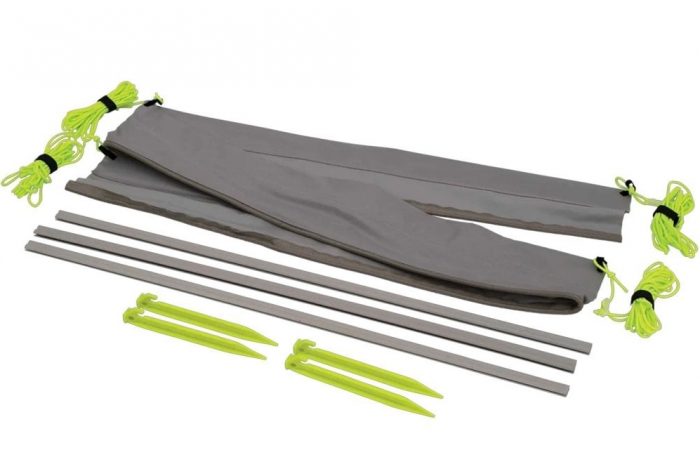
4. Webbing Straps
If all else fails, most awnings are supplied with large 8-metre webbing straps that can be attached over the top of your vehicle and secured on the other side. This option will not provide as strong a connection as an awning rail, but it’s quick and easy and will ensure you can fit your awning to any vehicle.
How to Pitch and Secure Your Awning
Setting up your drive-away awning is similar to setting up a tent. Follow these steps for a stress-free setup:
- Position the Awning: Unpack the awning alongside your van. Keep mesh doors zipped shut, but main solid doors open to allow air to enter.
- Make the Connection: Attach the awning to the van using your chosen method (e.g., sliding the Kador strip and Figure-of-8 connectors into your awning rail).
- Tension the Tunnel: Peg the bottom corners of the connecting tunnel slightly under your van so the fabric is pulled taut against the vehicle.
- Peg the Corners: Pull the main body of the awning away from the van until the groundsheet is flat. Peg the four main corners.
- Pitch the Structure: Inflate the air beams to the recommended PSI using your pump, or insert your fibreglass/steel poles.
- Final Tensioning: Zip all doors shut. Peg out all remaining guy lines and storm straps. Always peg your guy lines, even if no wind is forecast.
Expert Tip for Driving Away: Before uncoupling your awning to leave the campsite, place a brightly coloured peg directly next to your driver-side front tyre. When you return, line your wheel up exactly with the peg, and your awning tunnel will be perfectly aligned for reattachment.
How to Maintain and Clean a Drive-away Awning
To ensure your investment lasts for years, proper maintenance is critical.
- Cleaning: Never use harsh chemicals, bleach, or pressure washers. Wash the fabric gently using lukewarm water, a soft sponge, and a dedicated tent cleaner.
- Drying: Ensure the awning is 100% dry before packing it away for the season. Packing a damp awning invites mould and mildew.
- Waterproofing: Over time, UV exposure degrades water resistance. Pay attention to the Hydrostatic Head (HH) rating; a rating of 3000mm or higher offers excellent rain protection. Re-treat your awning every few years with a spray-on waterproof proofer.
Checklist: What You Will Need
Before you head to the checkout, ensure you have a complete setup:
- The Drive-away Awning: Sized correctly for your van’s height.
- Fixing Kits: Matched to your rail size.
- Tent Pegs: Heavy-duty rock pegs for hardstandings, or standard pegs for grass.
- Air Pump: If purchasing an inflatable model.
- Groundsheet/Carpet: For comfort and insulation (ensure it is breathable to protect campsite grass).
- Mallet & Peg Extractor.
Drive-Away Awning FAQs
Can you sleep in a drive-away awning?
Yes, sleeping in a drive-away awning provides the same experience as sleeping in a tent. Most styles are made with durable waterproof materials to keep you warm and protected. To create a comfortable environment ideal for a restful sleep, opt for an awning with multiple sections to create the illusion of separate bedrooms, or install a drive-away awning bedroom to incorporate a cosy element to open-plan awnings. Add your sleeping bag, groundsheet, or inflatable airbed for a ready-made camping bedroom.
What are the most common mistakes when pitching or aligning a drive-away awning?
The most frequent mistake is pitching the main body of the awning too far from the vehicle, which overstretches the connecting tunnel, preventing a snug fit and causing rainwater to pool on the fabric. Another common issue is struggling to line the van back up after a day out. To avoid this, always place a brightly coloured peg next to your driver-side front tyre before you uncouple and drive away. When you return, simply align your wheel with that exact peg for a perfect reconnection.
How do drive-away awnings perform in extreme weather, such as heavy rain or strong winds?
High-quality drive-away awnings from trusted brands are built to withstand typical British weather. Inflatable (air) awnings perform exceptionally well in strong winds because the air beams will simply bend and pop back into shape rather than snapping as rigid poles might. For heavy rain, awnings with a Hydrostatic Head (HH) rating of 3000mm or above will keep you dry. However, if severe storms or gale-force winds are forecast, the safest option is always to pack the awning down to prevent permanent damage.
How can I secure valuables left in the awning while I’m away for the day?
Because drive-away awnings are essentially fabric structures, they cannot be secured as completely as a locked vehicle. You can thread small luggage padlocks through the main door zips as a visual deterrent. However, the golden rule of campsite security is to leave only bulky, low-value items (such as camping chairs, dining tables, and wet-weather gear) in the awning. Always take your high-value items, like electronics, wallets, and keys, with you in the van when you leave your pitch.
What is the best way to store an awning during the off-season to prevent damage?
The most important rule for awning storage is to ensure the fabric is 100% dry before packing it away. Even a slightly damp awning will quickly develop irreversible mould, mildew, and bad odours. Once completely dry, brush off any loose dirt, pack it into its bag, and store it in a cool, dry, and well-ventilated place. Try to avoid damp sheds or outdoor garages where mice or rodents might chew through the fabric to nest; a dry spare room, loft, or insulated cupboard is the best choice.
Shop Awnings from Outdoor Action
Now that you know exactly how vehicle-attached tents work, how to connect them, and how to maintain them, you are ready to upgrade your outdoor living space.
At Outdoor Action, we are proud to offer high-quality drive-away awnings from established outdoor brands. We also stock all the essential tie-down kits and accessories you need to create a secure, sturdy setup.
Comments are closed here.